Monday 31 December 2012

Last bit of Christmas Crafting

Follow Me on Pinterest
Well I know it is a little late but I'd like to wish all my blog readers a very Merry Christmas. Thank you all for reading through 2012 and I look forward to sharing more crafty projects with you in the New Year. I have some exciting changes coming up in 2013 and will be structuring my posts so that I update on a regular basis. I have some exciting colour challenges lined up and a regular weekly embellishment tutorial feature planned also. So pop back in early 2013 and I'll have more info to share with you then ;0)

In the mean time, I thought I would share a last bit of Christmas craftiness. I was looking through my computer files and my SD card and thought I would share with you the last crafty projects I found hiding amongst pictures of projects I have already shared with you ;0)
 
This is one of our cards from the December card class. Inspired by an amazing card I saw on Pinterest. I love the stamped background and the white heat embossing over the top. Giving a bit of a swirl with Crumb Cake ink and a dauber over the embossing gives the darkened ink effect.
 
This second card is a stamping only Christmas card that can be adapted for any occasion by changing the greeting and colour (see the original inspiration here on Pinterest). This photo hasn't captured the shadow stamping behind the Garden Green swirls. I stamped the swirls first with my Illuminate Glimmer ink pad to give a bit of glittery bling to the card. The swirls, flowers and label are all stamped from the Everything Eleanor stamp set. The colour scheme is Garden Green and Cherry Cobbler.

 
And lastly, here is a project we made in my December workshops using the fab Season of Sweets Designer Kit from the Autumn Winter catalogue. I provided the gingerbread stars and everyone got to take home a lovely little package with a biscuit and gift label.


Thank you for stopping by today. I hope you are all having a fabulous festive season and looking forward to what lies ahead in 2013.

And just a quick reminder, I have my new virtual hostess club starting in the New Year. Click here to find out more and get in touch if you'd be interested in signing up ;0)

Happy Festive Crafting and look forward to more craftiness in 2013
-X-
Follow Me on Pinterest

Saturday 15 December 2012

A bit of Christmas craftiness

Follow Me on Pinterest
Happy Saturday morning to you all ;0)
 
Well first I must apologise for the lack of pictures this week of my workshop projects. They have disappeared. I have searched my craft room from corner to corner (and I know I have seen them somewhere!) and cannot find the gift tag and card we made. I am sure they will turn up. But it'll probably be in the New Year knowing my luck.

So instead I will share with you two of our projects from todays card class.

Firstly our 3D project for the month is this hot chocolate wallet.
 
This was inspired by a similar wallet I had seen on Pinterest. I thought as a festive treat for my craft class ladies this would be a lovely little project to make. It is embellished with images stamped from the Scentsational Season stamp set and mittens punched with the Mitten Punch.
 
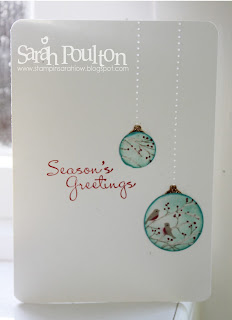
Secondly, I cased this card from the super talented Vicky over at Crafting Clare. I loved how she had created these baubles using the Serene Silhouettes stamp set so I had a go myself.

Her tip to use a two way glue pen and white embossing powder for the snowfall is absolutely perfect.

Thanks for stopping by today. I hope your Christmas-y preparations are going well. We are super excited to get Summer's first Christmas tree this weekend. Pictures to follow once decorated tomorrow. In the mean time, here is a festive pic of my little monkey taken yesterday to celebrate the season.
 
 
Happy Crafting
-X-

Follow Me on Pinterest

Saturday 8 December 2012

And now for something completely different.....


No papercrafting today I am afraid. My lovely school friend Hannah writes a fab parenting blog and she put a ginger challenge out there about a month or so ago. Inspired by the Great British Bake Off she wanted us all to put our thinking caps on and create a Christmasy gingerbread structure. So I set off to search Pinterest for inspiration (click here for my inspiration board). And inspire me it did. But not in an obvious way. I came across the following pic:


Now this is just a tourist souvenir and not at all gingerbready. But it reminded me of our family Christmas in Hawaii a few years back so I set our recreating it in ginger. And here is the result....

 Now I messaged Hannah a couple of weeks back and promised originality but not a perfect finish and I think I delivered. This was a team effort with my Mum, sister and Summer all pitching in to help and boy did we have fun making it (although who knew gingerbread could be SO tiring!)

I tried to Christmas it up a bit by making the fairy lights around the roof. I had planned a Father Christmas buried in the sand but I forgot my gingerbread man cutter. So it is a surf shack in the morning sun before it is open for the day (without customers!)

Here is the shop part of the surf shack complete with frothy cold beverages ;0)

The porch had a slight issue as it really didn't want to stay standing. So my surf shack has a bit of rickety character (not unlike the rickety house of Blackgang Chine ;0). But I will definitely enjoy eating it as I splashed out on Fabulous Fingers which are my absolute favourite (and remind me of being pregnant as I ate so many packs- sending Sam out at strange hours to buy them for me!)

Thank you for stopping by today. And if you've got a free minute, definitely pop by Hannah's blog for a read (and you've still got time to enter your own gingerbread creation too!)

And should you be popping by today for Stampin' Up! info, normal service will resume tomorrow with some projects for a party I am doing this afternoon. Please get in touch on 01983 609249 or poulton_sarah@yahoo.co.uk to chat about Stampin' Up! products, hosting a party, joining my virtual hostess club or attending a class locally.

Happy Saturday crafting to all
-XXX-

Friday 7 December 2012

Exciting news: Join my new Stampers 10 Club!

Hello again. Seems like an age since I updated. Has been a busy week as we took Summer on her first holiday to the Continent to visit the Christmas markets. And i have also been busy catching up with my annual December Journal Your Christmas Journal (photos to follow, it is still very much in the rough stages due to being away the first three days of the month).


I just wanted to blog today to share my exciting news for the New Year. I am launching my Virtual Hostess Club starting in January. Read on for more info on joining my Stampers 10 Club.

Earn free stamps & more!

Do you love the Stampin’ Up products but don’t necessarily want to host a Stampin’ Up workshop at your home? You may not have many crafting friends or have the space to host a workshop.

If you join the hostess club you can earn all the benefits associated with being a hostess without ever having to host a work-shop at your home.

I need 10 members to agree to join the club which lasts for 10 months. Each month I will contact you to ask what you would like to order for a minimum of £15 + 50p p&p. The 10 ladies take it in turns to be the virtual hostess and when it’s your turn you will receive at least £25 hostess pounds to spend on any goods of your choice from the catalogue as well as the goods you have ordered.

For joining you will also receive a FREE copy of The Idea Book & Catalogue (rrp £5.95). If you already have the current main catalogue I will reserve a copy of the new catalogue due out on 1st July 2013. You can of course order more than the minimum amount and have the possibility of increasing the hostess benefits.

For anyone not living local to me and unable to collect their orders, I ask for an extra £2.50 each month to help contribute towards the cost of posting your items via Royal Mail, I am happy to pay any extra postage charges if you parcel is more expensive to post. And on your hostess I ask you to pay the full cost of posting your items.

Please register your interest and once I have 10 ladies to start the club I will contact you to see if you are still interested in joining in. Please email me on poulton_sarah@yahoo.co.uk or give me a call on 01983 609249 for more information.


By joining my Stampers 10 club, you get the chance to spread the cost while building up your collection & are still able to enjoy the free benefits.
 
It’s that simple!
 
 
And I couldn't blog today without a little bit of craftiness. Sorry for the terrible photos. Not sure why they turned out so blurry. But here are the two layouts we completed in our November Scrapbooking class.
 
 The first was a simple 12x12 Very Vanilla base stamped with images from the Ornament Keepsakes stamp set. We embellished with papers from the Snow Festival Designer Series Paper set and with a Handmade Holiday Stitch Felt ornament. We also created the circular embellishments using punched images created with the Merry Minis punch pack.
 
For our second layout we used the new Divided Page Protectors to create three mini layouts. We stamped embellishments using the Polar Party, Wonderful Winterland and For the Birds stamp sets and embellished with buttons, ribbon and a Flourish Frame.

Please get in touch to find out more about Stampin' Up!, hosting a party or joining my new virtual club on poulton_sarah@yahoo.co.uk or 01983 609249.

Happy Friday Crafting ;0)
-X-


Monday 26 November 2012

A wet and windy weekend

Happy Monday to you all.
 
Just thought I'd post a quick catch up post about my weekends craftiness. The weather had a lot to answer for this weekend as I had a cancelled party on Friday evening as some ladies were travelling from the mainland for it and the weather interfered with their plans. And then I had a Christmas Fayre on Saturday which again was effected by the terrible weather. Every cloud has a silver lining however. Instead of craftiness, I had a lovely day chatting with my downline Sandy and my friends Chris and Pat on the stall next door. But sadly no customers! I have been left feeling super festive after a day of looking at other peoples Christmas craftiness and listening to Christmas music. Just in time for my festive break away at the weekend ;0)
 
Here are a couple of pictures of my stall on Saturday. My display board full of Stampin' Up! inspiration:
 
My make and take space and my bits and pieces for sale:

 I was looking through my crafty picture folders on my computer this afternoon and found this card class project I havent shared already. We made this in a card class a couple of months ago. A card folder. Perfect for keeping your Christmas cards in or for giving as a gift filled with cards and envelopes.

We made this using the Cottage Window stamp set.

This is one of my favourite stamp sets in the new catalogue. Two step stamping was the reason I fell in love with Stampin' Up! and their products. I love being able to interchange my images depending on the event or season.

Please get in touch if you have any questions or queries about Stampin' Up! or to book a crafty party with your friends ;0)
 
-X-

Thursday 22 November 2012

A Very Merry Christmas Treat

If you're stuck for a Christmas gift this year for a crafty friend. I have a perfect solution for you.... a Stampin' Up! gift voucher. I can provide these all year round for Christmas gifts or birthdays or as a just because pressie.

Here are two of my new style Christmas themed vouchers tied with our lovely Stitched Grosgrain Ribbon and using our fab Snow Festival Designer Series Papers.
 
 
I created this embellishment with the Snow Flurry Die and the For the Birds stamp set (and a bit of Cherry Cobbler glittery bling for the hat).

 I created this embellishment with the Scentsational Season stamp set and matching Holiday Collection Framelits. The sentiment is from the Come to Bethlehem stamp set.
 A view of the inside of the vouchers.
 And lastly, here is a quick crafty project I made recently. I had seen some lovely paper piecing cards on various blogs and wanted to have a go myself. I used the trees from Polar Party and stamped on different patterned Christmas papers cutting each tree separately to create this effect. I think it is such an effective technique for a quick and easy stamped Christmas card.
If you'd like to order a gift voucher or find out any more information on Stampin' Up! please get in touch on poulton_sarah@yahoo.co.uk or 01983 609249.
 
Happy Crafting ;0)
 
-X-

Sunday 18 November 2012

November Card Class Crafty Makes

We had another lovely card class afternoon yesterday. We welcomed a new lady and bid a Merry Christmas to our two cruising ladies who won't be able to attend our December card class. We had a lovely afternoon of chatting and mincemeat orange cake and coffee ;0)
 
Here are two of the cards we made yesterday. This was our card class finisher (which I always like to keep quite simple as sometimes we chat so much we run out of time). This was a simple wreath made from the larger Scallop Circle punch embossed with the Petals-A-Plenty Embossing Folder. We then punched a circle from the centre and embellished with Basic Rhinestones (super sparkly!). This was set against a white embossed background which was edged with the Scallop Ribbon Border Punch (Old Olive). The bow was made with Old Olive Scallop Dots Ribbon and the sentiment was stamped using More Merry Messages.
 
 This was our luxury card for Christmas. This was inspired by this card I had seen on Pinterest. We used the brayering ink on the embossing folder technique for the background. We brayered Crumb Cake on to the Lacy Brocade Embossing folder and then ran a piece of Naturals Ivory card through the Big Shot. This is almost a reverse coredinations style effect. We then stamped the the Ornament Keepsakes images in Soft Suede, Crumb Cake & Chocolate Chip and cut the coordinating Holiday Ornaments shapes from Champagne Glimmer Paper and layered them up (with some creative cutting and trimming to show as much of the glimmer as possible). We layered the embossed layer on to brushed gold cardstock and then on to a Naturals Ivory base and embellished with Basic Pearls.

Thanks for stopping by this bright and chilly Sunday morning. Hope you are all having a lovely weekend. We are wrapping up and staying warm in this household. The only one without a cold at the moment is Summer. She is most certainly full of beans. Sam and I are taking it in turns to try and keep up with her ;0)

Happy Sunday Crafting
-X-

Friday 16 November 2012

A crafty catch up

My poor blog has been neglected over the past week due to a house full of cold and bugs. First it was me and Summer and now my other half has it. I think we might've given it to my poor family also. So all in all its been pretty hectic trying to get us all better.
 
But on a positive note, I have been able to get some crafting done while we have been house bound and Summer has been napping.
 
Tomorrow is my monthly card class and it will be the last until the New Year for two of my regular class attendees. So I have created a couple of extra projects for us all to complete together. I always like to create a special fun chocolate gift bag for my December class but have moved it forward to this month for all my ladies. For this project I have used one of the glassine bags from the Ghoulish Googlies Designer Kit in the Autumn Winter catalogue and embossed it with the Petals-A-Plenty embossing folder. I cut a snowflake using the Snow Flurry Bigz Die and layered that with a stamped circle (the penguin from Polar Party) and a circle of Red Glimmer Paper. The banners are cut from the Be Of Good Cheer Designer Series Paper.
 
This bag is filled with lots of lovely chocolately Christmas goodies.
 
To make up for my quiet blogging week I will also share with you three cards I made at a Christmas showbox swap with 3 fellow Demonstrators on Thursday. We each brought enough supplies for each to complete each others card design. It was a lovely couple of hours and great to have a catch up and chat Stampin' Up! Here are the three cards I made provided by Sandy, Lorraine and Jane. It was lovely to get inspiration and see what different projects we all made. Look forward to seeing them all again soon (and Lorraine will have a new addition to celebrate too ;0)
 
Hopefully I will get a bit more time to blog this week and share all the lovely card class projects I have been working on.
 
Happy Autumnal Weekend Crafting to you all ;0)
-X-
 

Wednesday 7 November 2012

Come to Bethlehem Christmas Cards


I thought I would share two Christmas card projects today. For last month's card class I wanted to create a card with the lovely new Christmas-y stamp set, Come to Bethlehem, from the new annual catalogue. I had seen this set in the American catalogue and loved it and had my fingers crossed it would travel over to our catalogue.
 
The card above is the one we made during the class (inspired by this card I had seen on Pinterest). I love this vintage-y aged colour scheme- Brushed Gold and Chocolate Chip. And I always love a bit of daubering round the edges of the card for an aged look.  The image was heat embossed in gold on Naturals Ivory cardstock. This was then layered on to a background of Brushed Gold embossed with the new Lacy Brocade embossing folder.

This second card was one I toyed with demonstrating at our card class but chose the above card instead. I love how the wise men image fits so perfectly within the Apothecary Accents Framelit. I heat embossed the image in black and layered on to Brushed Silver Cardstock and another Lacy Brocade embossed layer in Night of Navy (I brushed my Illuminate ink pad over this layer to give a shimmery sheen). To create the night sky circle I punched a circle in a post it note as a template. I then inked Marina Mist and Baja Breeze over the star to create the night sky circle
 I love this stamp set and cannot wait to use it next month as part of my Journal Your Christmas album (I've been collecting supplies for it for a couple of months already).

Hope you liked my shared projects today. Please get in touch with any Stampin' Up! questions or to find out more about booking a party or attending a class. I'm happy to help in any way I can: poulton_sarah@yahoo.co.uk or 01983 609249.

I'm just off to pack my bag for a crafty birthday party tonight.  I do so love planning a Christmas themed birthday party crafty evening.

Happy mid-week crafting to all.
-XXX-

Saturday 3 November 2012

Halloween Scrapping

First things first, Stampin' Up! have announced two exciting new promotions for November. A really exciting ink pad promotion when you place an order for £325 (individual, party or group orders qualify) you will receive a colour family of ink pads for free (10 colours from with the Subtles, Regals or Brights). There is also another great promotion on the Ornament Keepsakes bundle. Buy the stamp set bundle and receive the matching Paper-Piecing Pack for free!! Wow, what a month to place an order or host a party with me. So many fab freebies!! To find out more please click on my promotions tab above.
 
Now, before you pack away all those Halloween crafty supplies for another year I wanted to share a few more projects you can use them for. I'm sure we all have a stack of pictures from Halloween so why not use your stamps and papers for a bit of seasonal scrapbooking.
 
These are the two pages we created at this months Stampin' Scrapping class. I had to dress Summer up and stage these photos as my class was on Monday, two days before Halloween. But with a headband and some orange cushions the pictures had a very Halloween-y feel.
 
This first page has an Elegant Eggplant base and uses the Howlstooth and Scaringbone papers to embellish the photo. We created a rosette using last years retired Halloween papers and the fantastic Big Shot Rosette die. We stamped the Frightening Feline in black on the background then using the Illuminate pad on black for the embellishment. We used a tag fom the Ghoulish Googlies for the journalling spot and then finished with Neutrals Designer Buttons. (We also finished with a bat stamped from the Googly Ghouls set and embellished with googly eyes)
The second page we created was a bit busy for my liking so I changed it slightly for the class (instead of stamping the Googly Ghouls witch in Basic Black with stamped her with versamark instead to give a tone on tone effect rather than too much busy black). I wanted to see if we could make the layered stamping effect work with a scrapbook layout. I love this effect of stamping over multiple layers. The colours on this page are Old Olive, Pumpkin Pie and Elegant Eggplant. The stamps used are the Googly Ghouls again. This witch is just perfect for embellishing a scrapbook page ;0)
 
Right, little Miss seems to be stirring so I had better post this sharpish (I have had this in draft since Thursday but not a moment to finish it!). I hope you are all having a lovely weekend and finding plenty of time for crafting ;0)

Happy Weekend Crafting All
-X-

Tuesday 30 October 2012

A little bit of Autumn Winter Christmas Crafting

Here is another of our card class makes from October's card class. I love how quick and easy the Festival of Prints Paper Stack makes layering cards and scrapbook pages. This card looks luxurious to me like the paper should actually be flocked. This card was a CASE of another talented Demonstrator, Tina Faghy, you can find her card here.
 
This card uses Very Vanilla and Cherry Cobbler with the Ornament Keepsakes stampset and matching Holiday Ornaments Framelits. I also used the Window Frames Collection Framelits to create the background layers (the Vanilla layer is embossed with the Vintage Wallpaper embossing folder). I embellished the centre of the Ornament with one of our new Large Pearls. The sentiment is from Teeny Tiny Sentiments and is layered with the Window and Modern Label Punches.
 
The final embellishment is the bow created with our lovely Cherry Cobbler Scalloped Tulle Ribbon. I gathered the centre of the bow using one of the new Vintage Trinkets button brads.
 
With Christmas on the horizon it is a perfect time to book a Stampin' Up! craft party. I have Christmas projects designed and ready to demonstrate through November and December, so please get in touch to book your date (poulton_sarah@yahoo.co.uk or 01983 609249).
 
Happy Crafting ;0)
-X-


Saturday 27 October 2012

Christmas Tea Light Card

 Here is our 'showstopper' card from this month's card class. I always love to do a more creative complicated project that would make a super special card for a loved one during our class. I had seen this card online recently and fallen in love with it. I had recently purchased the Christmas Lodge stamp set (I adore the Merry Christmas sentiment stamp in this set) and wanted to have a go at my version of this card.
 
In all the years I have been using Stampin' Up! products I've never crafted with Bravo Burgundy. It is such a perfect colour for this antique-y Victorian style card matched with our brushed gold cardstock. We gold heat embossed the beautiful Christmas Lodge sentiment  and inked the edges of the Naturals Ivory cardstock with Soft Suede and then layered with Bravo Burgundy and Brushed Gold cardstocks.
The magic of this card (and the element that made it a showstopper) is that the tree is stamped on vellum so when you place a battery tealight within the easel part of the card it glows and looks like a warm winters fireplace behind the Christmas tree. The photos don't really show the glow of the tealight too well. I need to read my camera manual to get to grips with taking photos of effects like that.
A closer view of the embossed vellum and tealight behind it. We decorated the tree with Cherry Cobbler Dazzling Details. We also used one of the new large pearls (and two smaller ones) to decorate the gold frame.
If you'd like any further information on this card or the products we used, please get in touch directly on poulton_sarah@yahoo.co.uk or 01983 609249. I'd be happy to chat you through this project or chat Stampin' Up! There is a little too much detail to fit into one blog post.
 
Happy Weekend Crafting to you all
-X-


Wednesday 24 October 2012

Halloween Treats


Last night I finally had some time to play with my lovely Googly Ghouls Stamp Set and Ghoulish Googlies Designer Kit. I had purchased lots of little Halloween treats for the bags and decided on the colour scheme (Basic Black, Lucky Limeade, Elegant Eggplant and Pumpkin Pie).
 
I started by running the glassine bags one at a time through my Big Shot using the Spider Web Embossing Folder. I then used my ink pads to colour the bags. I stamped the Designer Kit tags and embellished with the googly eyes. I've made one for each of my family all ready for Summer's first Halloween next week.
 
I've also welcomed three new Demonstrators to my team in the last fortnight so I have a lovely expanding team of Wight Stampers now. If you'd like to find out more about the benefits of becoming a Stampin' Up! demonstrator and joining my team, please get in touch on 01983 609249 or poulton_sarah@yahoo.co.uk.
 
Here is the welcome kit I made for my new demonstrators including a paper sampler and cardstock colour charts. If you'd like to join my team and get your hands on a sampler you can sign up now using this link.
 

Happy Crafting ;0)
-X-

Saturday 20 October 2012

Welcome to the Isle of Wight


We’re so glad you could join us on our Blog Hop. We’ll be showcasing lots of gorgeous projects using products from the new Stampin’ Up!® 2012-2013 Annual Catalogue. Simply use the buttons at the end of each post to keep on hopping. We love comments, so please do tell us what you think!
 
Welcome to the Isle of Wight for my little section of the Pinkies blog hop today. You will have joined me today from Nicky's blog who shared a lovely triple time stamping (my favourite technique as you know) project using French Foliage, a lovely set which has carried over into our new catalogue.
 
The projects I am sharing with you today have been made for my good friend Natalie who will be celebrating her birthday on October 28th. I wrote in her wedding card in March that a handmade gift would follow. Well it is following, just a few months longer than I had anticipated (in fairness life with a newborn didn't allow much time for crafting).

After Natalie got married in March I printed a whole load of photos and they have been sitting waiting for me to make them into something. I googled mini albums to find a suitable tutorial and really loved this design. I created my album base using Primrose Petals and Very Vanilla Cardstock to tie in with the Designer Series Paper I had chosen for the project, Patio Party. This mini album is made up of 6"x6" panels which is perfect for standard 4"x6" photos if you trim them slightly to give a border around the image.
 
 
I used one of our lovely Flourish Frames for the front cover (currently found in the Autumn Winter Catalogue). I stamped the monogram using our Broadsheet Alpha in Midnight Muse. I added the '&' and the date with my Raspberry Ripple Stampin' Write Market. I mounted this onto a strip of Raspberry Ripple cardstock which I sprayed with our brand new Vanilla Shimmer Smooch Spritz to give the front cover a bit of bling. The butterflies were cut with my favourite Beautiful Wings Embosslit.
 
 
 Here is the completed album unfolded. I embellished the pages with our brand new Elegant Butterfly punch and matching Papillon Potpourri Stamp Set. I used all the designs from the Patio Party Designer Series Paper as it matched the wedding colour scheme so perfectly. I also love to showcase all the patterns as it is such a shame to only use one side of the lovely papers.
 
 
To go with this album I wanted to make Natalie a birthday card. I absolutely love the new Fabulous You stamp and wanted to try heat embossing it. I tried several embossing powders until I discovered that it looked effective with plain silver against black.  I wanted a plain and simple card that showcased this beautiful and intricate set. I'm really pleased with the result (although weirdly I lost a rhinestone somewhere between making and photographing and also the card isn't so wonky in real life!)
 

Thank you for popping by my blog today. You can continue the hop with Alison and her fantastic circus creations using You're Amazing from our new Annual Catalogue.